top of page
Blog Home
FHF.blog.header.png
Search


I know you've seen them in various boutiques, galleries and even antique shops - those gorgeous live-edge tables that make your jaw drop. Then you flip over the little price tag and you almost have a heart attack. You do a quick search online and see that the prices are similar there as well. What gives?

The thing is - live edge tables are extremely popular right now - so the maker can pretty much charge whatever they want and will likely be able to sell it for that price once the right buyer comes along. A quick search on Etsy reveals that live-edge tables that use a hard wood (like oak), and that are coffee table size or larger, can run anywhere from about $600-$1800. Not including shipping.

But the truth it...they're really not that hard (or expensive) to make. They certainly take time, and you'll have to have the right tools to get the job done, but if you have any experience with DIY projects at all, I can guarantee you're going to be able to handle this one just fine. And, you can do it all for under $400.

Getting started:

First things first, you'll need to pick out your wood slab. The most affordable option is to find a local lumber yard that stocks a variety of live-edge slabs, but you can also find them online. We got ours from Alderfer Lumber in central PA, and we had a lot to choose from! We are lucky that Ryan's uncle is actually in the lumber business and knows a lot about the different species of wood, so we had him pick out the slab for us. Ours was white elm.


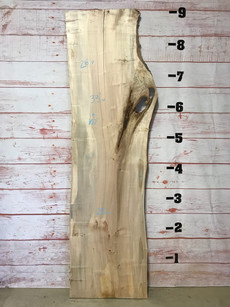
When looking for a slab, you'll want to consider the following:

  • Species of wood - do you want a light wood or a dark wood? Something heavy or something light? Something with lots of knots or something more clean

  • Knots/cracks - Are you going for a "river" table, something with just a few filled areas, or a completely crack/hole free surface? Make this decision before you head in so you're not stuck with an issue later

  • Size - You'll want to find something that is as close to the size of the table you're making so that you don't have a ton of excess waste. These are gorgeous trees after all, and we certainly don't want to be wasting them.

Once you have your beautiful live edge slab - evaluate the piece and decide on the following.

  • Will you be filling holes/cracks with epoxy?

  • Will you be staining, oiling, or sealing?

  • What kind of legs do you want?

Then, go ahead and buy your supplies in the order above (more sources from what we used in the details below).


Preparing the wood:


Now that you've bought all your supplies, you're ready to rock & roll. Give your piece of wood a good sanding with 120 grit sandpaper. This will not be the last time you sand, but doing this before filling the holes will help in the long run. Make sure to avoid any areas on the edges that you want to preserve - like bark or coloration changes, or even certain knots or voids. Decide which side is going to be your “top” and which will be your “bottom”, and label accordingly.

Go ahead and test the stain or finish on the underside of your wood if you’d like to. Since you’ll be sanding after the next step anyways, you’ll be able to sand off most of this “test patch” – but I would still recommend testing on the bottom of the slab to avoid discoloration on the top. We tested a variety of oils and ended up going back to our trusty Danish Oil.

Filling the holes/voids

This depends on your slab, but many people love the look of the filled-in cracks, holes and voids in a live edge piece of furniture, and are looking for the same finish. Some even choose to dye the epoxy blue for a "river" effect, but we decided to leave ours clear. We used the West System 105A Epoxy Resin, which you can purchase on Amazon.

Flip the piece over so that its bottom side up – and then tape any holes or cracks that go all the way through the slab so that the resin stays in the hole/crack and hardens accordingly. For large cracks/holes you may even need to reinforce this with something stronger – we used a scrap piece of plywood and clamps for one of our larger cracks.

Mix the resin according to the directions - but do we recommend doing it in small batches. We used plastic cups to mix a little bit at a time so we wouldn't be wasting any – since once it hits the air, it starts hardening and won’t be usable if left out for even an hour.

You’ll want to pour the resin in batches – especially for larger holes – so that it hardens layer by layer. Pour a thin layer into the hole or crack and let it settle. Use a hairdryer or blow torch to encourage any air bubbles to come to the surface, and pop them. This is a time-consuming and somewhat tedious process – but we actually found it fun. Let each layer dry overnight before adding another one.

Keep repeating this process until the holes & cracks are completely filled. You’ll notice that as it hardens it seems to contract and it will look less full each time you return to the piece – but that’s totally normal. Just keep at it.

Finishing:

Once all of your resin is in place and you’re happy with the piece, take it for another sanding. Get off all the extra epoxy that may have dripped or seeped out of the holes and go for a nice smooth finish. You may want to use an even finer grit paper – like 220 – for this step.

Then you’re ready to stain your piece. Follow the instructions on whichever stain or finish you choose, and we recommend finishing with a polyurethane protective coat. We used a matte, wipe-on poly since we wanted a finish that looked more natural (rather than glossy or shiny).

Now it’s time to attach your legs! We went with these cast aluminum matte black legs from Etsy – and I absolutely love the industrial character it brought to the piece. You could also search local antique shops for old cast iron legs, or go with the very popular (and affordable) hair pin leg style.

AND YOU’RE DONE! See, easy right?

For more behind the scenes footage of our live edge table-making experience, check out my Instagram highlight: https://www.instagram.com/stories/highlights/18081043540082937/

Its been ONE YEAR since we moved into our first home (forever), and its pretty crazy to look back on all we've accomplished in just a year of living here. One of the benefits about documenting your life online is that you can look back and see all the progress you've made. So I've rounded up my top 5 projects from the past year to share with you.


Here we go!


1) The mudroom

All I did in here was paint, and it made a HUGE impact.


The previous owner had gone with some bright green and blue colors, which just didn’t really fit our style. I chose to paint the walls Revere Pewter, and for the ceiling, I chose Hamilton Blue.

You guys know I love to paint, but this room was SO. HARD. I purchased a high-nap roller thinking that would work great for the stucco walls, but boy was I wrong. Even with the high nap roller, I had to go back in and brush the majority of the wall – stippling with a small stencil brush to get in all the nooks and crevices of the stucco.

If was going to do this again I definitely would have invested in a paint sprayer, but I do love the final product. I just recently also decided to paint the door. I used Fusion Mineral Paint for the first time and I am definitely HOOKED. I didn't use a primer, and it only took 2 coats to cover the red and completely transform the door.


2) The stenciled tile floor in our downstairs bathroom

This tile was one of my least favorite things in the house. It was also paired with a peach color wall paint, which made the whole room feel very warm and southwestern. With no natural light in this bathroom, I wanted to tone down the warmth and give it a more equally balanced vibe.

Thankfully the countertops also have some gray graining in them – so I knew I could play off that and pull in more cooler tones. I started by painting the walls – which certainly helped a ton – but knew I still had to do something to the floors.

Since the long term plan for this space is a true renovation of this bathroom, I felt fine about putting painting the tiles even knowing that it may not hold up forever. I did a lot of research of others who have done this – some say it’s been 5+ years and it’s still holding up great, while others have had the paint chip or peel in some areas. I was willing to take the risk.

I have a full blog post on how I stenciled these floors. I absolutely LOVE how they turned out – and after 6ish months of use – they still look brand new.

3) Our live edge coffee table

I absolutely LOVE our live edge coffee table. I originally went into this house thinking I was going to go with a “French country” style for all of our furnishings, but when we got our existing furniture (that we weren’t ready to part with yet!) into the space, I know that just wasn’t going to work. This table pushed us into a more rustic/industrial vibe, which I think I love even more than what I had originally planned.

Although there were definitely some learning along the way (you mean painters tape doesn’t hold up when you pour 2 cups of epoxy on it?!), we still talk about this as one of our favorite projects and would love to do another someday.

4) The laundry room


The laundry room was kinda a spur of the moment update. There was nothing necessarily wrong with the previous laundry room – the paint was fine and it was perfectly functional – I just didn’t love it. I made super simple updates in here like adding contact paper to the existing counter top, adding peel and stick wallpaper to the back wall, and re-painting the whole space.

I have an entire blog post dedicated to this project, so you can learn more about this one here.

5) The man cave/studio

The man cave was definitely our most ambitious project. When we toured the house, Ryan was disappointment by the low-ceilinged and relatively small basement space because he had dreams of having a studio space that was fit for both jamming with the band and recording. It was only when I agreed that we could finish the space over the garage within the first year that he was really sold on the house – so we knew this would be one of the early projects we had to tackle. It took about 3 months and lots of physical labor, but he loves his new space. Especially with COVID hitting this year and us both having the work from home – we’re happy we finished it when we did so we could both have separate & far away spaces to work from.

If you want to know the top 5 things we learned from finishing this space, you can read more about it here.

So what’s next on the horizon for the second year? Well I don’t know about Ryan, but I definitely have some ideas up my sleeve. Stay tuned to see what project we come up with next.


1) Framing is pretty easy and you can totally do most of it yourself

If you’ve worked with wood in any capacity before, then you should be able to do most of the framing yourself. If you’re working on a section that’s actually structural, you may want to have a 2nd opinion, but for in our case we were working inside a structure that already exists and just building within it.

It definitely helps if you have more than one pair of hands though – so recruit some help!

2) If you’re going to finish an attic space like this one, you’ll need to vent the roof.

Venting, like these pink foam sheets in the picture below, provides airflow between your insulation and the sheathing and prevents heat and moisture damage to your roof. This will ensure the longevity of both the roof and the insulation beneath.

3) Hiring out the drywall was worth it, but don’t expect it to be perfect just because a “professional” did it.

Drywall is quite heavy and very challenging to hang – especially on ceilings. You’d probably need at least 3 decently strong friends to do it yourself, and even then, you might regret it. We decided to hire someone for this piece, and although it cost us about $5K to do so, we’re very glad that we did. But we did learn that even when a professional does it – it’s not going to be perfect. There were some wavy seams where the pieces of drywall joined and some gaps that we had to fill around the windows, but all in all it was still worth it. (For context, the materials were probably about $1K, so we paid $4K in labor).

4) Don’t put the paint away. You’ll have to touch up something – we promise.

I can’t even tell you how many times we closed up the paint cans & washed all the brushes only to find a spot we missed, or a spot that got nicked or chipped the next day. Do yourself the favor and keep you paint handy. You can also wrap up your paint brushes in plastic wrap and put them in the fridge if you know you’re going to use it again the next day, rather than washing it out each time!

5) Trimming out windows and doors makes a huge impact, and it’s a super easy 1 day project.

The window trim & window sills were one of our favorite parts of the projects because it was so easy and made such a big impact! We looked up standard measurements but mostly just used the existing windows in the house as a base, and matched the same style. We did go a little deeper with the window sill, which I love, and now I want deep window sills everywhere in the house!

What would we have done differently?

Maybe the flooring. We used a wood-look laminate flooring that “floats” on top of the subfloor. This essentially means that it’s not glued or nailed down – it just clicks together and then the baseboards help hold it in place. There are some spots where it’s just not completely flat because its shifted around as we’ve walked around on it, moved furniture on top of it, etc. If we were to do it again we would spend a little more time making sure that all the pieces were tightly clicked together so that it wouldn’t have shifted as much.


for the gram...

bottom of page